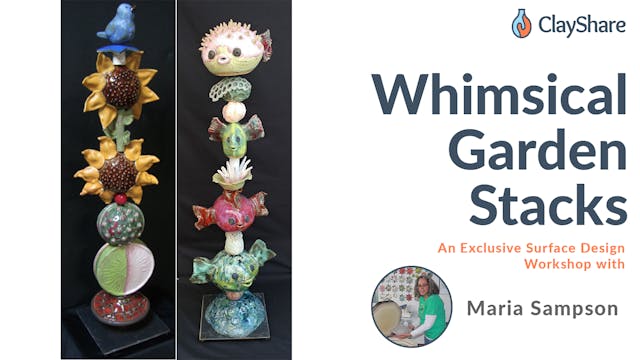

Whimsical Garden Stacks
As a participant you can get 20% off at Georgies with code ClayShare Maria from March 8th through April 24th 2021 on Georgies clay and glazes (kits not included), the HC4 Member Hole Cutter, and MKM rollers.
You can also use code SAMPSON15 for a 15% discount on clay puzzling molds at learnfiredarts.com and will go through May 15th, 2021.
April 10, 17 & 24
1-3pm EST
This is a 3-week class, 2 hours per week. During our time together we will discuss the basics of building a garden stack from making a sturdy stand to important factors to consider when making and glazing your pieces. We will be shaping forms using slabs and templates, hump/slump molds and pinch pots and experimenting with ways to add texture to slabs. Maria will be using Timberline Sculptural clay body from Georgies Ceramic & clay. We will be using a variety of brand name, brush on glazes including Mayco, Amaco and Georgies Ceramic & Clay Interactive Pigments and Glazes. There will also be an emphasis on glaze testing & making the dreaded glaze test tiles. Please keep in mind that you will not complete your garden stack during our class sessions – you will have homework. Maria will be available via email ([email protected]) for any questions or issues that may arise while you are making your garden stack during this class.
April 10
The first class will be focused on important aspects of making a garden stack. In particular, we will discuss the construction of a sturdy stand for your whimsical garden stack, appropriate clay bodies to use, developing a theme, measuring issues and using shrinkage rulers, having filler pieces, and of course glazing. We will be making a simple garden stack form and some test tiles for glaze tests.
April 17
The second class will focus more on forms and using templates. We will be making a small bird house, perhaps a bird, and filler pieces, and test tiles for glaze tests.
April 24
Our last class will focus more on glazing and assembly of your whimsical garden stack.
Tools
• Hole Cutter: I use a Kemper (HC4) 7/8” hole cutter
• Texture Mats and Rollers
• Slump/hump molds: My favorite are:
o The round 5 ¾”x2 ¼” diameter (CD776) from Mayco
o The oval 7”x5 ½”x1 ¾” (CD777) from Mayco.
o 7.5” Bowl Hump Mold from Shimpo
o Hydro Bat Hump Molds from The Ceramic Shop
• Basic handbuilding tools
• Stand
o 10” square x 3” deep garden paver
o ½” thick rebar
o Drill
o ½” – 5/8” drill bit that will drill cement
o Cement filler
Maria was born & raised in Detroit, Michigan. She attended the University of Michigan in Ann Arbor where she received a Bachelor’s degree in Psychology and a Master’s degree in Social Work with a focus on geriatrics and medical social work. Several years later, she returned to grad school and received a Master’s degree in Business Administration from the University of Phoenix.
After a 20-year career in medical and geriatric social work, Maria became burnt out and “retired”. In 2007, Maria’s clay journey began when she took her first handbuilding class at Georgies Ceramic & Clay in Portland, OR. After becoming the classroom studio assistant at Georgies, a front counter position opened, and Maria jumped at the chance to become an official Georgies employee. When Maria relocated to Eugene, OR in 2012, she became the store Manager and handbuilding instructor at Georgies of Eugene. Maria is well versed in all Georgies brand clays and glazes. Her specialty is handbuilt garden art.
Since moving to Albuquerque, NM in 2019, Maria’s focus has been on building her own ceramic business and learning how to play with clay in such a dry, arid climate. Maria also enjoys dabbling in glass, encaustics, and mixed media.
-
Whimsical Garden Stacks Session 1
The first class will be focused on important aspects of making a garden stack. In particular, we will discuss the construction of a sturdy stand for your whimsical garden stack, appropriate clay bodies to use, developing a theme, measuring issues and using shrinkage rulers, having filler pieces, ...
-
Whimsical Garden Stacks Session 2
The second class will focus more on forms and using templates. We will be making a small bird house, perhaps a bird, and filler pieces, and test tiles for glaze tests.
-
Whimsical Garden Stacks Session 3 - Part 1
Our last class will focus more on glazing and assembly of your whimsical garden stack.
How to watch on Roku:
https://www.clayshare.com/videos/watching-workshops-on-rokuHow to watch on iOS:
https://www.clayshare.com/videos/watching-workshops-on-ios -
Whimsical Garden Stacks Session 3 - Part 2
Our last class will focus more on glazing and assembly of your whimsical garden stack.
How to watch on Roku:
https://www.clayshare.com/videos/watching-workshops-on-rokuHow to watch on iOS:
https://www.clayshare.com/videos/watching-workshops-on-ios -
Whimsical-Garden-Stacks-Tools.pdf
96.4 KB
-
 352 KB
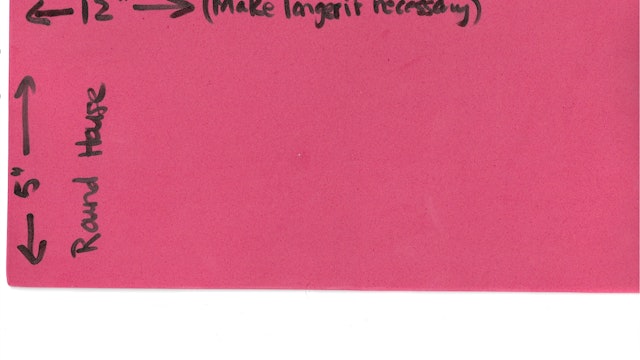
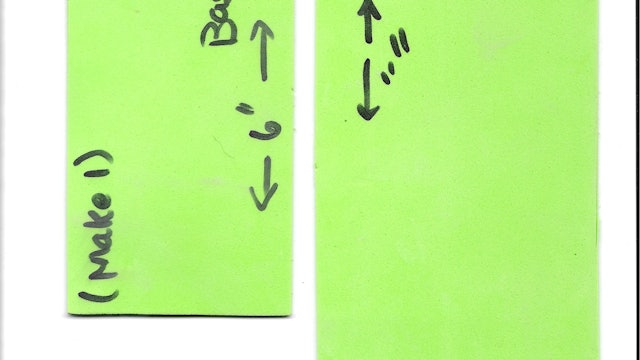
Birdhouse-Front-and-Back.pdf
352 KB
-
357 KB
Round-Bird-House-Top.pdf
357 KB
-
 1.61 MB
Roundhouse-Side.jpg
1.61 MB
-
 1.42 MB
Birdhouse-Side-Top.jpg
1.42 MB